Overclocking the CPU does not have to be very complicated. We will introduce the basic principles of overclocking, why you want to do this, How to overclock CPU, and best practices to achieve stable overclocking. 1 2 3 4
Overclocking the CPU is an excellent way to tap the extra performance of the hardware. This process may seem complicated, but the basic principle of overclocking is straightforward. We will introduce the basics of overclocking, how it works, and safe self-operation methods.
We provide a detailed description of two popular overclocking methods. The first and easiest method is to use the Intel® Extreme Debugging Utility (Intel® XTU). This all-in-one software can complete most of the heavy work and simplifies the overclocking process, which is very suitable for novices.
If you want a hands-on, customizable way. If you have the latest generation of Intel® Core™ processors installed,
we will start with the basics and introduce to you one by one what you need to know about overclocking your CPU.
Changing the clock frequency or voltage may invalidate any product warranty and reduce the stability, safety, performance, life, etc., of the processor and other components.
Table of Contents
CPU basics
The CPU (central processing unit) is the brain of the computer. This is complex and powerful hardware designed to perform many calculations per second to power the modern computing experience.
The computing speed is affected mainly by its operating frequency clock (also known as CPU clock frequency, CPU frequency, or clock speed). How to overclock CPU The higher the frequency, the faster the processor can perform many calculations required for the system’s regular operation.
The basics of overclocking
To overclock the processor, overclockers will deliberately increase the CPU operating frequency above the original inventory specifications. Since the processor’s frequency significantly affects the effective calculation speed of the CPU, the ultimate goal is to increase the frequency of the CPU to achieve faster performance.
Three factors determine the CPU frequency:
- BCLK or base clock speed. This is the basic frequency of the CPU, usually measured in GHz.
- Multiplication factor or “kernel multiplication factor.” Each CPU core has a multiplication factor. Applying these multiplication factors to the base clock frequency, the result is the core frequency, usually measured in GHz.
- Vcore or core voltage. This is the primary input voltage of the processor. A higher voltage level is required to obtain a higher stable CPU frequency because faster speeds require more power. Higher core voltage will also result in higher heat output and greater CPU power consumption.
In short: BCLK x multiplication factor = CPU core frequency.
Example: 100 MHz (BCLK) x 44 (core multiplication factor) = 4400 MHz = 4.4 GHz. This number (in GHz) is the most likely number you encounter when viewing basic CPU speed specifications.
To increase the CPU frequency during overclocking, we will increase the multiplication factor at intervals of +1, systematically increase the processor frequency by 100 MHz each time, and test for success and stability. After that, we will continue this process until we reach the limit of the hardware.
In addition to adjusting the frequency, the overclocking process may also need to increase specific voltages and adjust other performance settings on the system to maintain high-frequency stability.
Hardware required for overclocking
Now that we have introduced the basics let’s explore the hardware necessary to try overclocking.
The important thing is that when you try to overclock the CPU, be sure to use an appropriate cooling solution. Higher speed and voltage mean that the CPU generates more heat. Therefore, the CPU needs a more efficient cooling solution to operate safely. When trying to overclock, a powerful CPU cooler is essential.
It would help if you also had a CPU with a K or X at the end of the name, such as the Intel® Core™ i9-9900K processor. The K series and X series suffixes indicate that the frequency multiplication factor on the unit is not locked, so overclocking is allowed. To learn more about the names and naming of Intel® processors,
In addition, you need a motherboard that allows overclocking. There are many manufacturers to choose from, but you need to look for Z-series (such as Z390) or X-series (such as X299) motherboards, depending on your CPU. These chipsets have built-in support for overclocking and other features to enhance your experience further.
To meet different market specifications, two identical Z chipset motherboards may have different functions. Be sure to choose the motherboard that suits you.
Determine baseline performance
Now that you have the hardware, including the appropriate CPU, motherboard, and cooling solution, we can begin the overclocking process.
The first step is to measure the system’s current performance under the inventory (default) setting. Be sure to do this before making any changes. This makes it easy to spot problems and track any changes in performance.
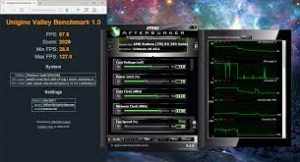
To establish a benchmark, you need to use benchmark software. These software tools can evaluate the effective computing performance of the system and allow you to track any improvements. Other tools will help monitor essential indicators such as CPU clock frequency, voltage, and temperature at various stages of the overclocking process.
The reason for the initial system benchmark test is to confirm that everything is normal before overclocking and to determine a benchmark to quantify the impact of overclocking on performance. This will provide insight into the system performance and the effectiveness of the cooling solution.
Here are a few essential factors to monitor when you run the first test:
- CPU voltage (core voltage): What was the CPU core voltage during the benchmark test? Check the core voltage value under load rather than idle time because the motherboard may automatically reduce this value to reduce power consumption when idle.
- During the stress test, CPU temperature was the highest temperature reached by all CPU cores (package temperature)? Also, what is the temperature of the hottest core? Keep in mind that room temperature should be considered at this stage, as it will affect the readings and the performance of the cooling solution.
- System power consumption: What is the maximum power consumption of the system?
- Benchmark test score: What is the final score of the benchmark test?
Important note:
- Many different numbers are tracked during overclocking. You can’t remember these measurements, use a simple spreadsheet to track all the numbers, or use the most primitive method and write them on paper.
- If you want to pass certain benchmark tests to get a more specific benchmark score, you may need to run it multiple times and calculate the average result.
- If the difference between the CPU temperature readings is significant, it may indicate a more astonishing installation or improper thermal grease application.
Start overclocking
Now that you have a benchmark, you can start the actual overclocking. We recommend a gradual approach. You need to make some minor changes, test them, and then continue. This will quickly correct possible problems because you can easily determine which change caused the problem.
Overclocking for the first time
As mentioned earlier, there are multiple ways to perform a step-by-step overclocking process. We recommend starting with Intel® XTU because it provides all the tools needed for benchmarking, modifying settings, and testing system stability.
If you want more control over performance and settings, you can also overclock the CPU from your computer’s BIOS, but this method is recommended for more advanced users. Due to BIOS
Either way, you need to adjust the core multiplication factor of the CPU first to increase the target frequency slowly. You may notice that some values are initially set higher than others. Set all available cores to the same value. Here we use -2 to set all cores to 4.2GHz.
The idea is to set all CPU cores to the same speed to ensure that all CPU cores run at precisely set frequencies.
When you use Intel® XTU or adjust the CPU timing via BIOS and make appropriate voltage adjustments, apply these changes and restart the system.
After trying to overclock: How to overclock CPU
When you change the system settings, apply these settings, and restart the system, you will encounter one of the following two situations:
- The system is stable, and you want to continue overclocking to get better performance. If so, please repeat the process of multiplying the CPU by +1. Apply the new settings, restart, and then enter the “Measuring Performance Gain” section.
- The system is unstable, which means the system crashes or freezes when restarting.
If the system is unstable, you have several options. The first is to increase the core voltage to compensate for the increased frequency, which helps to enhance stability.
When increasing the CPU core voltage, keep in mind that any extra power running on the CPU will affect the heat output. In any case, it is essential to find Best wireless mouse with the lowest stable voltage, so you can only increase the voltage step by step, increasing ±0.05 V each time. Then apply and test until a valid combination of settings is found.
Another option is to reduce the frequency by lowering the value of the multiplication factor until the system is stable. If you have reached the voltage/temperature limit, this may be the only option.
Important note: When using traditional cooling methods (such as air or liquid), do not let the voltage exceed 1.4V. For temporary load spikes, be sure to keep the maximum CPU temperature below 100°C; for long-term workloads, keep it at 80°C or lower.
Please refer to the “Managing Power Consumption and Heat” section for more information on CPU temperature limits.
Hardware limitation
You will eventually reach the limits of the system in terms of frequency/voltage/temperature. Each system has different limits.
Once the limit is reached, your options are:
- Try to overclock the CPU cache. The application principle is the same as above, but only the CPU cache multiplication factor is used.
- Try to overclock the RAM. Memory speed can have a considerable impact on performance.
- Upgrade to a better cooling solution.
- Check whether safety measures limit performance and decide whether you are confident in making these adjustments. You can read more about security measures below.
Once you have applied the changes and the system has successfully restarted, it is time to see what changes have been made and verify stability and performance.
Measuring performance gain: How to overclock CPU
Effective performance measurement is the cornerstone of successful overclocking. This is the only way to measure performance gains.
Earlier, you obtained benchmark performance indicators by running benchmark tests. Now it’s time to rerun the same test and compare the scores.
Overclocking is an iterative process. If this is the first attempt, the performance improvement may not have reached your goal. How to overclock CPU This is normal. With each successive fine-tuning of performance, you will get closer and closer to your performance goals.
After rerunning the benchmark test and comparing the scores, you can use this setting to ensure stability or continue to modify the setting to improve performance.
Power consumption and heat
Monitoring power consumption and heat is an essential part of the overclocking process. At this stage, your cooling solution will largely determine whether you can successfully overclock.
You should also pay attention to the upper limit of the CPU temperature. To know the maximum allowable temperature of the CPU, find the “Tjunction” of the CPU by searching. In the example below, you will see that the Intel® Core™ i7-9700K processor has a temperature limit of 100°C. You don’t want the CPU to be at or near this temperature under load. For most normal CPUs, around 80°C or below 80°C is ideal, so ensure that the overclocking results reflect this.
When the temperature exceeds the specified T-junction limit, there is a risk of overheating, damaging the processor. Even if there are safety measures to reduce the risk, you always need to find the lowest possible temperature for any given performance setting to ensure the longevity of the CPU.
System stability: How to overclock CPU
When overclocking, you will break through the hardware limitations. So in this process, your system may eventually become unstable. System instability may manifest as:
- Caton
- Shut down
- Blue screen error message
- freeze
These problems mean that there is an imbalance in your setup. Don’t panic; this is a normal part of the testing process because the system has reached its limit. You only need to use the reset button to restart the system; if the reset switch does not respond, you can turn it off and on again.
At this point, there are three possible outcomes:
- Even if it is turned off and then turned on, the system does not start. In this case, you must clear the CMOS, erase the BIOS settings to reset the motherboard to the default configuration, and then restart.
- The system restarts. When the system crashed, How to overclock CPU it had not yet reached the maximum temperature limit. In this case, we can slightly increase the Vcore of our processor and try again. Please do not increase the voltage excessively, as it will cause more heat output and may put pressure on the CPU.
- The system restarts. When the system crashed, it had reached the critical temperature limit, and protective measures were activated to prevent the CPU from overheating. You have found the limit of the system cooling solution. In this case, it is recommended to reduce the clock frequency of the operating processor to fall back to a more stable state within an acceptable temperature range. To do this, you may need to lower the CPU Vcore, upgrade to a more robust cooling solution, or try other settings that will improve performance but have little impact on temperatures, such as CPU cache, memory frequency, memory timing, or operating system optimization.
The last step in the overclocking process is to verify the long-term system stability. The system restarts without crashing immediately do not mean that it can be used for a long time.
A more prolonged and more intensive stress test must be carried out to determine whether the system is genuinely stable. How to overclock CPU We can use specialized software applications to check the long-term stability of the system under various workloads. Learn more about stability testing and stress testing software here.
Safety is a priority: How to overclock CPU
Modern computer hardware is usually designed with safety measures to protect the system from potential damage due to power fluctuations or overvoltages.
When overclocking, you may encounter these integrated defenses, many of which come from the system’s power supply. You may be able to disable or modify the parameters of these safety measures, but this is not recommended unless you are confident about operating, as this may damage the hardware.
Below is a brief overview of some of the security measures you may encounter:
Temperature Protection (OTP): This protection measure limits the CPU temperature to a predetermined maximum temperature. If the system temperature is too high, the computer will automatically limit the CPU (reduce its frequency) to bring the temperature back to a safe level. This will cause a decrease in CPU performance. If this overheating limit is still insufficient to lower the temperature sufficiently, the system will automatically shut down.
Overload protection (OPP): The motherboard is designed to maintain a certain level of power throughput. If the power consumption of the CPU is too high. Best processor for gaming How to overclock CPU the system will activate this protection. Like OTP, this will reduce the system clock speed to lower the temperature, and if it is unsuccessful, it will eventually shut down the system.
Another Protection: How to overclock CPU
Overcurrent protection (OCP): This is another protection measure found in all computers. As the voltage and frequency increase, the current in the CPU will increase. For some motherboards, you can choose to change this value. (In Intel® XTU, this operation can perform through the “Processor Core ICCMAX” setting. There is probably the same option in the BIOS.)
Over Voltage Protection (OVP): This measure will activate when the CPU input voltage is too high.
Undervoltage protection (UVP): This measure is the opposite of the function of OVP. If the CPU voltage is too low, the system will shut down.
Short Circuit Protection (SCP): This measure will activate when the motherboard detects a short circuit. There is no reason to disable this protection.
Overclocking software and tools
To achieve successful overclocking, you need software support to simplify the process. The software can help safely modify settings, perform benchmark tests and experiments, and perform system monitoring and stress testing to ensure stability. How to build a pc The following chapters will briefly introduce some of the essential tools and software utilities that make up the overclocking toolkit.
This list is not exhaustive, but it can provide a good starting point.
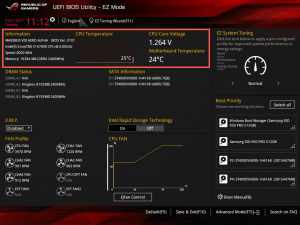
BIOS
BIOS (Basic Input/Output System) is software that runs on the motherboard. (In newer motherboards, it is also called UEFI [Unified Extensible Firmware Interface].) The BIOS functions at the lower level of the operating system, manage the motherboard and allow communication with all installed hardware.
In the BIOS, you can also adjust the performance parameters of the hardware, including RAM, storage devices, and CPU.
It is important to note that the visual presentation of the BIOS varies from motherboard manufacturer to motherboard manufacturer. To access the BIOS, you need to press a specific key (such as F2 or “Delete”) after booting up and before the Windows* loading screen appears. Please refer to the motherboard documentation for specific instructions.
Intel® Extreme Debugging Utility (Intel® XTU)
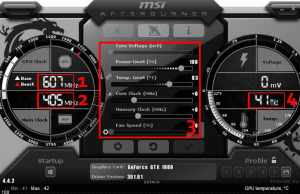
Intel® XTU is a potent overclocking tool. The software combines some of the essential functions required for overclocking into one application.
Intel® XTU can detect and monitor hardware, test stability, help to overclock, and run benchmark tests. The software layout is straightforward and provides the essential functions required by intermediate overclockers.
CPU–Z*
CPUID’s CPU-Z* is a simple, lightweight application that provides basic information about the processor, motherboard, and RAM. It recommends for novices and experts who need simple monitoring solutions.
Core Temp
Core Temp is another useful monitoring tool designed to monitor the temperature of each core. It also displays the real-time power consumption of the CPU.
RealBench*
RealBench® is a benchmarking utility developed by ASUS to simulate high workload environments, such as photo editing, video encoding, and multitasking using AVX.
3DMark*
3DMark* from UL Benchmark is a benchmarking utility that includes two processor tests and combined CPU and GPU workloads. 3DMark is a good benchmark choice for measuring overall computer performance, significantly gaming workload.
Final thoughts: How to overclock CPU
Now that you understand how to overclock, you can fully tap the potential of the CPU.
Here are a few fundamental principles to keep in mind when overclocking:
- Do not worry. Change one setting at a time, and test before continuing.
- Be sure to pay attention to the CPU temperature and keep the temperature as low as possible while maintaining stability.
- Do not allow the CPU voltage (core voltage) to be too high.
- Never modify unfamiliar settings or security measures.
After remembering these four principles, your overclocking experience will be fun, safe, and rewarding. Enjoy the faster clock speed!