Do you have a PC from a few years ago that still works pretty well but gets very slow when you try to run multiple programs at the same time? Well, know that you can get it back almost as good as new by spending very little money and relying solely on your strength. Like? But obviously by increasing the amount of RAM inside. And yes, you read that right, all by yourself!
The RAM, if you not aware of it, the memory in which all the data of the processes performed on the PC temporarily stored, the more you have available, the more the system performance increases. With this guide, I want to show you how to expand the RAM inside your computer without calling a technician. I know it may seem like a very complicated thing to do, but I assure you that you too will be amazed by the ease of the operation.
If you therefore actually interested in the matter, I suggest you take a few minutes of free time to devote to reading the instructions below, to position yourself comfortably in front of your computer and to strictly follow my instructions. Of course, you will also need to find and purchase the right additional RAM for your computer but you don’t have to worry, this is also a fairly simple thing to do. So tell me, are you ready? Yes? Perfect. So let’s ban the chatter and proceed. You will see that you will not regret it.
Table of Contents
Preliminary operations
Locate the RAM on PC
Before getting to the heart of the guide and discovering how to expand the RAM. You need to do some preliminary operations to choose the right type of RAM for your PC. In fact, you must know that there is not a single type of RAM and therefore you can expand the memory of your computer only by purchasing additional banks of the same type as the one already present in your PC.
If you are using a Windows PC, desktop or laptop, you can find out what kind of RAM is mounted by using the free CPU-Z program that doesn’t even need installations to work.
To use it, connected to the software download page using the link I have just provided, click on the ZIP • English button on the left and then click on the Download button . Once the download is complete. Extract the contents of the archive to the location you prefer on your computer and then double-click on the executable file contained within it.
RAM Information
nce the CPU-Z window is displayed on the desktop, the program will show a series of tabs with all the technical information relating to your PC, RAM information can be found by clicking on the Memory tab . In the field located next to the Type item, you will find the type of memory present on your PC (eg DDR3 , DDR2 , SDRAM , etc.), while in the one under the DRAM Frequency item you will find the frequency of the RAM in use.
The frequency is another important data, as there are RAM of the same type but with different frequencies. laptop docking station. On your PC, you can also mount memory banks that don’t have the same frequency, but be aware that this way the RAM will use the lower frequency.
Locate the RAM on Mac
If, on the other hand, you are using a Mac, you can find out what type of RAM is mounted and therefore which one you can buy to expand it, using Mactracker , a free application that provides detailed technical specifications for each Mac model and for all other products. Apple produced by the company up to now.
To use it, connected to the application’s Mac App Store web page by clicking on the link I gave you a moment ago, click on the View button in the Mac App Store and then click on the Get / Install button and if required provide the password related to your Apple account.
Once the installation is complete, open the Launchpad and select the Mactracker icon. Once the main program window is displayed on the desktop, select the item This Mac in the left column and then double-click on the name of your computer that appears on the right to open its data sheet. Now select the Memory and Graphics section and in correspondence with the Maximum Memory and Memory Slots items you will find indicated, respectively, the maximum amount of RAM supported and the type.
Buy RAM
Now that you know this basic information, you need to purchase the new RAM to install on your computer. If you want advice, do a search on the Amazon site and you will find all types of memory you want at very affordable prices (just go to the Electronics and Computing> Computer Components> Memories menu ).
If you want some buying tips, you can also read my guide on which RAM to buy . you buy only one memory bank, you will hardly spend more than 40.00 euros.
Before confirming the purchase, however. Make sure that the RAM you are about to buy is actually compatible with the motherboard of your computer. Also in this case, there is no need to resort to the technician. You can check the compatibility of a certain type of memory with your computer’s motherboard by doing a quick search on the Internet, reading the motherboard’s manual or using online services such as Memory-UP , where you just type in a computer model to immediately have a list of compatible RAM.
Expand the RAM on PC
At this point you should finally have the new RAM bank (s) to install in your computer. Therefore, you should turn off your computer,disconnect it from the power supply and remove all the various. And any devices connected to it.
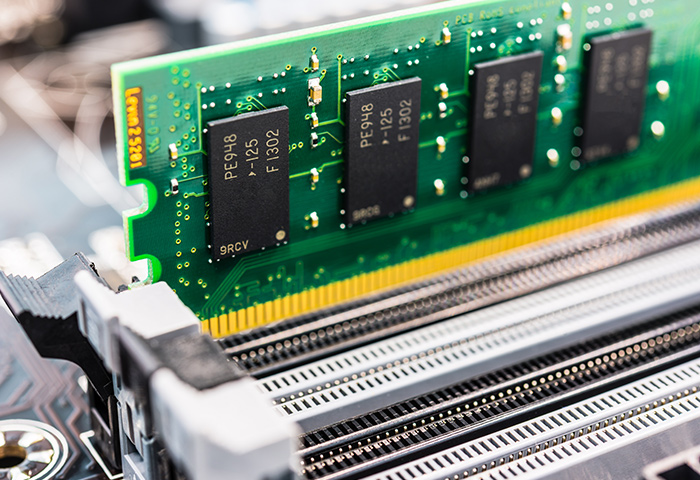
Then arm yourself with a screwdriver and unscrew all the screws on the sides of the case of your PC. When you done,remove the side panels and locate the free motherboard slots in which to insert the RAM. microphone for computer. There should at least one right next to the bank of RAM already installed in the computer.
To install the new memory module. All you have to do is place it in the free slot next to the existing RAM bank and exert. A slight pressure.When you hear a “click” and notice that the two white plastic. Fins have adhered perfectly to the RAM bank. Fixing it in its position, the operation was successful.
In case you want to replace the original RAM module with the new one purchased, the procedure is the same. You just have to loosen the white tabs from the memory bank installed in the PC.Remove the latter. And replace it with the new memory. Then close the case and turn on the computer. This is as far as fixed PCs are concerned, while for notebooks the matter becomes a little more complicated.
Your laptops,basically the procedure to carried out to expand the RAM. Practically the same as that seen above for desktop computers but considering that each laptop has a different arrangement For. The memory.Modules and, often, to find the housing you have to remove many internal components. In other cases, however, just unscrew a flap on the back of the notebook.
User Manual
To find out how to disassemble your laptop. I therefore suggest you find the user manual of the same. On which all the necessary indications should be present to understand which steps to take to expand the RAM. If you do not have the printed user’s manual of your laptop, you can look it up on Google trying to type portable manual user name (replace with the name portable the laptop’s name in your possession).
At this point. All you have to do is turn on the computer on which you have installed the RAM and make sure. That everything went smoothly. To be sure that the new memory has been recognized, click on the yellow folder icon located on the taskbar, right-click on the item Computer or This PC (the wording may vary depending on the version of Windows in use) that it’s on the left and then select Properties from the menu that is shown to you. In the window that opens, you should find indicated the amount of memory available on the PC under the item Installed memory (RAM) .
In case of problems, remember that you can check the status of the RAM memory with dedicated software,
Expand RAM on Mac
If, on the other hand, you have a Mac. The procedure to implemented to install the purchased RAM for your computer. Even simpler than the one seen in the previous lines for Windows PCs. In the case of iMacs and MacBooks, it is sufficient to turn off the computer, disconnect it from the electricity supply and remove all the various and any connected devices.
So arm yourself with a Philips-type screwdriver and unscrew and extract the panel located under or behind the screen. Keep in mind that on some Apple computers. Instead of having to unscrew the panel, simply press a button to open it. Then you have to unroll or widen the plastic tab or the lever in the compartment where you can insert. The memory and insert the new or new RAM banks by gently pushing them until you hear a “click”.
Replace the new memory
If, on the other hand. You need to replace the new memory modules purchased with those already in use. Gently pull the tabs in the various slots to extract the installed RAM and then make the change. Remember to insert the new RAM in the same direction it inserted on the previously in use.
In both cases, when finished, remember to fold the tabs on the memory modules and close the access door.
At this point. There nothing left to do but log in to the Mac you have installed the RAM on and check,that. Everything went well. To be sure that the new memory has been recognized, click on the bitten apple icon located at the top left of the menu bar, select the item About this Mac and then click on the Memory tab attached to the new window that is gone to open up. how to screenshot mac. In the window that opens, you should find indicated the total amount of memory installed on the computer as well. As how many and which slots have been occupied.
If you need more details. You can consult the specific web pages dedicated to RAM. Expansion on iMacs and MacBooks attached to the official Apple support website. Also on the Apple support website, there are step-by-step instructions on how to expand the RAM of the Mac mini and Mac Pro . The procedure almost similar to the one I indicated earlier. The only thing that changes is the housing of the memory modules.