How to send Images from iPhone mobile to System (iCloud & AirDrop, Mac operating system (OS), PC)
The three most straightforward ways to send images from iPhone mobile to System, with and without iCloud, for old and new operating systems (OS). Our devices have become our go-to devices, which means we can’t ignore importing our iPhone mobile pictures to our course forever. If you want to send pics from your iPhone mobile to your system, How To Transfer Photos From Iphone to Computer has many options. The traditional way to download images from your iPhone mobile is to use the photos send feature in the built-in Images app that both Mac operating system (OS) and PC offer.
You can also import images from iPhone mobile to Mac operating system (OS) operating system wirelessly using the iCloud account. Resetting a Hp Laptop If you have a recent Mac operating system (OS) operating system, you can use AirDrop for an incredibly easy send of images to your system. Getting shots from your iPhone mobile may be frustrating, but it doesn’t have to be. This article will make sending your pictures from iPhone mobile or iPad (even the newest devices like the iPhone mobile 12 and the iPhone mobile SE 2) to a Mac operating system (OS) or PC a breeze.
How to Send Images from iPhone mobile to Mac operating system (OS) in the Mac operating system (OS) operating system Catalina & Big Sur
- Connect your iPhone mobile to your Mac operating system (OS) system with the USB cable and unlock your iPhone mobile.
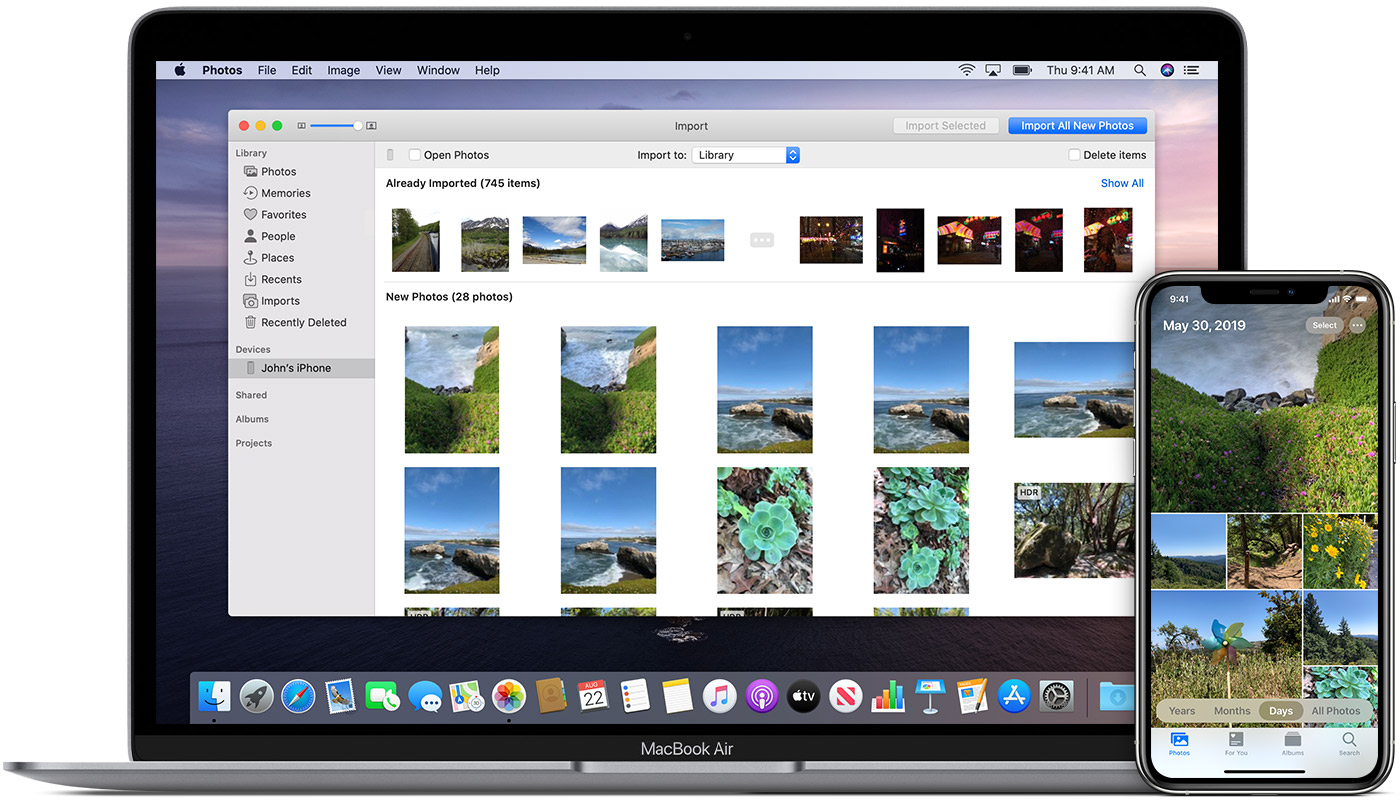
- Open the Images app on your Mac operating system (OS). One can find it with Spotlight search, in your Dock, or by opening the Applications folder and selecting the Images app.
- Your iPhone mobile should already be selected in the browser on the left of the Images page. If it isn’t, then choose your iPhone mobile.
- Select the images one wishes to import by clicking on them.
- Click the Import
- That’s it; Finder made this process easy!
How To Import Images from iPhone mobile to Mac operating system (OS) in the Mac operating system (OS)OS Mojave
- Connect your iPhone mobile to your system with the USB cable.
- Open the Images app on your Mac operating system (OS). One can find it with Spotlight search, in your Dock, or by opening the Applications folder and selecting the Images app.
- Select File from the upper top menu, then select Import.
- You can download select images by holding down the command key on your keyboard while clicking all the pictures you want to send, then tick Review for Import.
- Suppose you’ve formerly imported some or all of the selected images. In that case, your Mac operating system (OS) will let you identify, then give you a choice to import the remaining photo(s) by clicking Import New Photo.
- If you’d instead import all the images on your iPhone mobile that you haven’t previously backed up, click Import All New Items.
- To view the recently imported images, select Last Import on the sidebar. And you’re done.
Send Images from iPhone mobile to PC
How to Import Images from iPhone mobile to Personal Computer in Windows 8
If you have a personal computer with an older version of Windows, AutoPlay will pop-up when your iPhone mobile is connected to your system with a USB cable. On a PC with Windows 8, your system will detect the device and provide a pop-up that says, Tap to select what happens to this device. When you tick on that pop-up, you’ll get the choice to Import pictures and video files. How To Transfer Photos From Iphone to Computer The rest of the procedure should be almost similar to what is under for Windows X. When in uncertainty, look for the Importation button.
How to Import Images from iPhone mobile to PC in Windows 10
- Plug your iPhone mobile into your Windows system with the USB cable.
- A pop-up will ask if you would like to allow the system to access the iPhone mobile on your iPhone mobile. Tap Allow.
- On your Windows system, the Images application may automatically launch. If it doesn’t, launch the Images program using the Windows search bar or Start menu.
- Click the Import control in the upper right corner of the Images application.
- In the pull-down menu, choose From a USB device.
- If you have numerous Universal Serial Bus plugged into your Personal Computer, such as a thumb drive, you’ll be probed to select which one you need to import from. Select your iPhone mobile.
- The system will search for images to import, then a box with the new pictures for send will pop-up. If the Images application crashes here, you may have a common bug. Try the alternative method listed below.
- Select the images you want to import.
- To see where the images will be saved and to alter that location, tick Import settings.
- In the import situations menu, you will see the position the images will be protected and a dyed link for altering the import end.
- Click Done to go rear to the image choice screen.
- Once you’ve nominated the pictures you want, tick the Import button.
- Once they’re imported, you can view the images in the Images app’s Collections app or select the Album icon on the left sidebar to view specific albums.
Import Images from iPhone mobile to PC with a Cable, Another Method
Some users meet bugs with the critical Windows Images application. If one can’t get it to work and need another solution, try this.
- Plug your iPhone mobile into your Windows system with the cable, unlock the iPhone mobile, and tap Allow, as above.
- On your Windows system, navigate to This PC. You should see your iPhone mobile listed under Devices and Drives.
- Right-click on your iPhone mobile, and in the context menu, select Import images and videos.
- You can choose either to Import all fresh items or analyze, organize and group stuff to import. I mention selecting to Appraisal because the instinctive organization may not be perfect.
- The More options tie at the bottom bargains options to change where the files are saved, but the default Pictures folder is sufficient for most users.
- Click Next, and the system will scan your iPhone mobile for pictures and videotapes.
- In the next window, select the objects you desire to import.
- At the end of the menu, a slider changes how the pictures are grouped into files, e.g., by the hour, by day, by month, or by year. You can slip it all into the mode to the right to get them all in one folder.
- Click Import when you’re ready to send images.
Next, we will probe into the two, unlike ways to send pictures with iCloud: Picture Stream and iCloud Picture Library. How To Transfer Photos From Iphone to Computer There are some crucial distinctions between the two that we’ll go over; my best recommendation is to enable both.
How to Import Images from iPhone mobile to Mac operating system (OS) with iCloud Picture Stream
Picture Stream does not take up any of the iCloud Storage packages. However, images will seem in Picture Stream for only thirty days (we explain this under). Picture Stream also doesn’t upload your videotapes, but you can view your images across your devices. How To Transfer Photos From Iphone to Computer For both methods, Images will automatically send when your device is in a Wi-Fi zone unless you have enabled the option to ship over cellular. To set up Picture Stream, you’ll want to permit it on both your iPhone mobile (or iPad) and system.
- On your iPhone mobile, open the Settings applications.
- Tap the banner with the name at the upper of the Settings page.
- Tap iCloud.
- Choose Images.
- Toggle on Upload to My Photo Stream.
- On your Mac operating system (OS), open the Images app. If you’re on a personal computer, click here to download
- From the Images menu, select Preferences.
- Select the iCloud tab.
- Check the container next to My Picture Stream. Click Done.
Note: In Mac operating system (OS)OS Mojave and earlier, the same setting is found in System Preferences > iCloud > the Options button next to Images.
- Now images will inevitably be added to Picture Stream when you’re in a Wi-Fi zone. But remember, images remain in Picture Stream for thirty days or up to 1000 pictures.
To set it up so that your Picture Stream pictures spontaneously download to your Mac operating system or PC:
In Mac operating system (OS)OS Catalina, you don’t have to do anything special. The Images app on your Mac operating system (OS) automatically saves your photostream to your photo library.
In Mac operating system (OS)OS Mojave or earlier, follow these steps:
- Open the Images app.
- Select Preferences at the very top, under Images.
- Select General.
- Check the box following to Importing: Copy Objects to the Photo Library.
This way, even once images leave your Photo Stream, they will save it to your system. You can also permit the iCloud Picture Library on iPhone mobile and system to pay for iCloud storing. Doing so will help you keep your images in the Cloud, making them accessible online and on your system.
How to Download Pictures from iPhone mobile (or iPad) to System with iCloud Images
The process for setting up iCloud for Windows Images is similar to Photo Stream. Enabling iCloud Images will store all of your images in your iCloud account, not merely the freshest. This can quickly use up your iCloud storage space unless you pay Apple for more. How To Transfer Photos From Iphone to Computer, On the other hand, your images from your system and your iPhone mobile will all back it up in the cloud, and the process of sending photos from iPhone mobile to design will be practically effortless since iCloud will keep the two libraries in perfect sync.
Your iPhone mobile:
On the iPhone mobile, open the Settings app.
Select your name.
Tap iCloud.
Choose Images.
Toggle on iCloud Images.