Here we are discussing How to delete a page in Word. A large portion of us – regardless of whether understudies, office representatives, artisans, or researchers – use Microsoft Office, and all the more explicitly, Microsoft Word, in our day by day lives. It’s essentially everybody’s go-to programming suite for efficiency, and all things considered. Its program of uses is amazingly dependable and exceptionally ground-breaking profitability instruments that fill some requirements.
Table of Contents
Colossal Stage of How To Delete A Page in Word
However, a colossal stage of its clients doesn’t understand exactly how incredible they are. We should take Microsoft Word, for instance. While it is intended to cause word handling to feel more like a walk around the seashore than a monotonous undertaking with its catches, robotized capacities, and accessible routes, numerous clients scarcely know – not to mention, use – the majority of them. Thus they wind up making an excessive No of strides and a more drawn-out time than should be expected to do the more unpredictable errands.
While erasing a page in Word, for instance, a few clients wind up giving their mouse or delete button somewhat of an exercise, all since they don’t know that there’s a more continuous approach to do that.
If you’re one of those people, you’ve gone to the perfect spot. Today, we will show you a few more effective approaches to erase a page in Word, regardless of whether you’re a Windows 10 or a Mac client because, frankly, your delete necessities an excursion.
Step by step instructions to erase a page in Word on Windows 10:
There are a few more straightforward approaches to erase a whole page in Word. Brain you, there’s no catch you can tap on to erase a page mystically. As valuable as that would be, we’re sure Microsoft has its explanations behind not making that accessible. There are better, also more expert, ways other than holding your delete key.
Strategy #1: Go To function
Microsoft Word’s Go-To work permits your cursor to cursor, instead of look, to a page, zone, line, or critique your show, generally to save you time. Think of it as teleportation – as opposed to walking around a store to buy a pop, you disappear from your current region and appear at your goal. How does PayPal work
When you need to erase a page in Word, the Go-To work not just ‘transports’ your cursor to the page you need to erase, yet it also lets you feature the page’s substance, basically preparing it for cancellation.
Important Stages
Stage 1: On the tab that says ‘Home,’ click on the Find drop-down catch and select Go To. Or, of course, press Ctrl+G.
That should open the Go To tab in the Find and Replace talk pack.
Stage 2: Type in the page No in the Enter page number substance box and snap Go To.
There, you can jump the page you have to eradicate by forming in its page number. If you do not have the foggiest mind regarding its specific page number, you can, in like manner, type in + or – to bounce the page. You’re correct now on to the page you’d want to delete. For example, if you’re on page 1 and the page you’d prefer to eradicate is four pages down, you type +4. By then, click in a rush To attach. Doing so would take you to the page you decided.
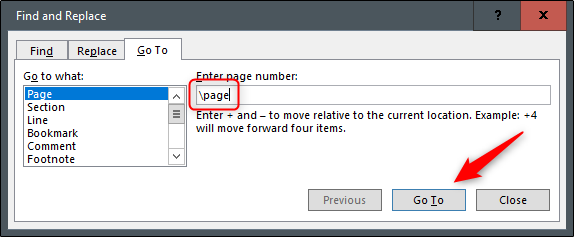
Stage 3: Type “\page” by then, click Go to highlight the whole page. Snap Close once included.
Make the substance “\page” in the Enter page number substance box and snap “GoTo” highlights the entire page you wish to eradicate.
Stage 4: Press erase or eradicate to delete the page.
Right when the whole page has been highlighted, you’re allowed to press the erase or eradicate button once. That effectively deletes the page in general.
Strategy #2: Navigation Pane (for clear pages)
Utilizing the Navigation Pane’s Thumbnails Pane tab permits you to see and rapidly look through your report’s pages by giving you admittance to their thumbnails. This component lets you breeze through your record, rapidly find the page you need to erase, and double tap on it so you can leap to the genuine page.
This technique is incredibly helpful when you coincidentally made many clear archives, regardless of whether by unintentionally holding the Space Bar or adding a page break. The Navigation Pane lets you effectively figure out which pages are clear.
Stage 1: Go to the tab that says ‘View’ and switch off the Navigation Pane box or press Ctrl+H and snap on the Pages tab in the Navigation Pane.
Opening the Navigation Pane, by and large, secured on the left-hand side of the application window, and tapping on the Pages tab will show the thumbnails of your chronicle pages all together.
Stage 2: Scroll through the pages. By then, find and twofold tap on the specific page you’d like to delete.
That should take you to the beginning of the picked page.
Stage 3: Press (Ctrl+Shift+8) to mention the segment marks. If it’s an extra entry (or five) that made a similar page appear, press eradicates for all intents and purposes until the page is destroyed. Which shouldn’t take a massive load of time if a Page Break achieved the specific page; select page break and press erase.
Instructions to erase a page in Word on Macintosh:
Erasing a page in Word on Macintosh is fundamentally the same as when you’re doing it on a PC. There are, nonetheless, a couple of glaring contrasts practically because of MacOS’s particular arrangement of alternate way keys just as the application’s marginally unique UI.
Strategy #1: Go To function if You Want to Delete A word Page
If you haven’t read the part for Windows 10, we should do a quick boost at that point. The Go-To work allows your cursor to cursor, rather than look, to a page, segment, or line you indicate, as though carrying the cursor to that area to save time for you.
The Go-To work not just ‘transports’ your pointer to the page you need to erase, yet it also lets you feature the page’s substance, preparing it for erasure.
Stage 1: On the Main Menu, go to Edit > Find and select Go To. Or, then again, essentially, press Fn+Cmd+G.
That should open the Go To tab in the Find and Replace trade box there.
Stage 2: Type in the page number (number of pages) in the Enter page number substance box and snap Go To.
You can jump the page you have to eradicate by forming in its page number. In case you don’t have the foggiest thought regarding the page number, you can, in like manner. Type in + or – to bob from the flow page to the one you’re looking for. For example, if you’re on page 1 and the page you’d like to delete is four pages down, you type +4.
Stage 3: Type ‘\page’ by then, click Go to highlight the whole page. Snap Close once the substance is included.
Create the substance ‘\page’ in the Enter page number substance box and snap “Go-To.”
Highlights the entire page you wish to eradicate.
Stage 4: Press delete to eradicate the page.
When the whole page has been included, press the delete catch to eradicate the entire page in one plunge.
Technique #2: Navigation Pane (for clear pages)
Utilizing the Navigation Pane’s Thumbnails Pane tab permits you to review and rapidly look over your record’s pages. By giving you admittance to their thumbnails. This element lets you breeze through your report, rapidly find the page you need to erase. And double-tap on it so you can leap to the real page.
This technique is incredibly helpful when you’ve coincidentally made a lot of clear reports. Regardless of whether by unintentionally holding the Space Bar or adding a page break. The Navigation Pane lets you effectively figure out which pages are clear and subsequently need cancellation. How To Split PDF Into Pages?
Stage 1: On the View tab and switch off the Navigation Pane box (Pan of Navigation). Snap-on (attached to it) the Thumbnails Pane (first tab) in the Navigation Pane.
The Thumbnails Pane, which consistently appears on the left-hand side of the window. Shows the thumbnails of your file pages all together.
Stage 2: Scroll through the pages to find the specific page you’d want to delete. When found, twofold tap on it to move your cursor to the beginning of that page.
Stage 3: Press’ Cmd+8′ to show the segment marks. In case it’s an extra area (or five) that made a similar page appear. Basically, select the section checks and press delete on the off chance that a Page Break achieved the specific page. Fundamentally select page break and press eradicate.