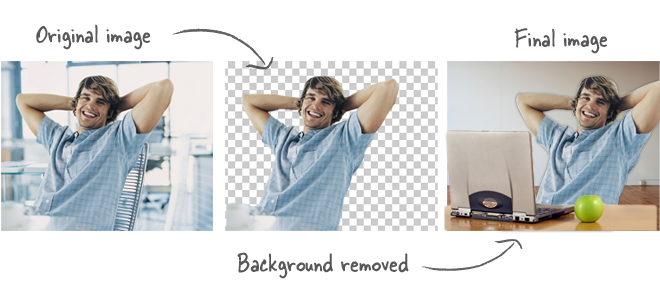
After returning from vacation, you made yourself comfortable on the sofa and started looking at the photos you took with your friends – you are entirely satisfied with their quality and can’t wait to frame them. Some of them are so fun and special that you would like to take out the subjects and paste them on other backgrounds. Don’t worry. You don’t have to be a graphics expert to do it: if you want, I can easily explain how to remove the background from an image and create your photomontages.
Contrary to what you might imagine, removing the background from a photo is not at all complicated: you need to know how to use well the programs and online services suitable for the purpose, and that’s it. And if you need it, you can also act directly from your smartphone or tablet, in this case using some photo editing apps that are quite intuitive (even if less precise and comfortable to use than desktop solutions).
So, what are you doing still standing there? Come on: make yourself comfortable, take your time to concentrate on reading this guide, try the various solutions that I am about to list, and then use those that seem most suitable for your needs. You will see, erasing the background from an image will take you a few minutes, and the results you will get will be more than appreciable. I wish you good reading and, above all, have fun!
Table of Contents
How to remove the background from an image with GIMP
One of the first solutions I recommend you try to remove the background from an image in GIMP: it is a very famous photo editing program for Windows, macOS, and Linux that is 100% free, as well as open-source. It integrates many photo editing tools, including some that are very useful for removing the background from photos background remover.
To use GIMP, you must first download the program. Then, Connected presses the Download XXXX button to this page and then click on Download GIMP XXXX directly. When the download is complete, open the installation file you got from the GIMP site and, if you use Windows, first press the Yes button and then OK, Install and Finish.
On Mac, instead, drag the GIMP icon into the macOS Applications folder, right-click the program icon and select the Open item from the context menu to “bypass” the restrictions applied by Apple to non-certified developers (This is only necessary when starting GIMP for the first time).
If you have never tried doing this before, you can order professional image background removal services to save time.
As soon as you have installed and started GIMP, select the Open … item from the File menu, import the photo you want to retouch and select the Switch Quick Mask item from the Select menu. As you can see, the image will be colored in red: at this point, like the Path tool by pressing the fountain pen icon located in the toolbar on the left and traces the perimeter of the subject that you want to separate from the background by repeated clicks, to insert the connection anchors close to each other. If necessary, move the connecting lines to perfectly adhere to the profile of the subject you have traced: you will get an even more accurate result!
Remove Background With GIMP
Once this first (and fundamental) phase of the work complete, disable the quick mask by selecting the Switch quick mask item from the Select menu again, press the Selection button from the path present in the toolbar located on the left to transform the way into a selection, and then click on Invert from the Select menu to invert the choice made.
At this point, all you have to do is remove the background from the photo: first, however, I suggest you “soften” the selection a little so as not to make the retouches too evident. Then select the Gradient item from the Select menu and, in the window that opens, USB wifi adapter set 3,000 as the Gradient selection value of and press OK. Then remove the background by pressing the Delete / Backspace key on the keyboard and saving the retouched image by selecting the Export as the File menu item. If you want to keep the background transparent, remember to choose PNG or GIF as the output format.
If, on the other hand, you want to paste the cut-out subjects on another image, copy the image by selecting it all ( Ctrl + A or cmd + a ) and choosing the Copy item from the GIMP Edit menu, open the idea on which to paste it and paste it ( Ctrl + V or cmd + v ) and then save the final result.
How to remove the background from an image with Photoshop
Suppose you want to remove the background from a photo. In that case, you cannot fail to consider Photoshop, the famous photo editing program developed by Adobe, mainly used by professionals working in photography and graphics. Being a software used in the professional field, it is paid: although you can download it for free and test all its features for seven days, to continue using it even after the trial, you need to subscribe to Adobe Creative Cloud, which starts from 12.19 euro/month.
If you decide to use Photoshop to complete your work, start the program on your computer and import the image you want to remove the background by opening the File menu, selecting the Open … item, and then choosing the file of your interest. Then activate the Quick Mask mode by pressing the rectangle icon with the circle located at the bottom left, selecting the black color in the palette, and then coloring the background of the image using the Brush tool.
Then deactivate the Quick Mask mode by clicking again on the symbol of the rectangle with the circle located at the bottom left, select a Selection tool from the toolbar located on the left, right-click on the selection made, and click on the Select voice inverse from the contextual menu to invert the selection. Then, I advise you to “soften” the piece made by pressing the Refine Edges button located at the top right and using the adjustment bars that appear on the screen to improve the selection edges. When finished, press the OK button.
Remove Background With Photoshop
Now, press the keys Ctrl + C (on Windows) or cmd + c (on macOS) to copy the selected subject, create a new image by selecting the New item from the File menu, choose the width and height of the new image, select the settings regarding the appearance you want to give to the background from the Background Content menu (e.g., Transparent, to obtain a photo with a transparent background) and finally press OK.
Finally, press the Ctrl + V (on Windows) or cmd + v (on macOS) keys at the same time to paste the previously copied image and save the output photo in the format you prefer (e.g., PNG or GIF, if you want to preserve transparent background). If you have chosen to create a picture with a transparent background, know that you can paste it on an already existing image, always pressing the Ctrl + V (on Windows) or cmd + v (on macOS) keys after opening the photo in question. For more information on how to make the background of an image transparent and how to crop in Photoshop, consult the guides that I have already published on my blog: they will be instrumental.
How to remove the background from an image with PowerPoint
Want to insert an image without a background into a project you’re working on in PowerPoint? If you do not want to resort to the software, that. I have listed in the previous chapters. Know that you can do this using an ad hoc function integrated into the Microsoft Office suite’s famous software.
Before discovering together how to best use the function in question, I want to tell you that it cannot be used to remove the background from vector images (such as those in SVG, DRW, etc.) and that for this guide, I used Office 2016 (although the above steps should apply to all newer versions of Office from 2013 onwards).
To begin with, start PowerPoint on your computer. Open the project you want to act on (or create a new one), click on the Insert tab. Press the Images button and insert the image in the current slide. Then click on the image from which you want to remove the background. Click on the Format tab located at the top right. And then press the Remove background button located at the top left.
Remove Image Background With Powerpoint
The area you want to remove – the background of the image – will be colored purple, and the main subject you want to keep will continue to have its natural colors. Usually, you get a good result without acting on the image, but if a part of the subject is “cut off” by the PowerPoint background removal tool, use the gray dots to move the selection area and keep/remove the desired photo.
If the image you are working on is incredibly complex. You can get an accurate result by clicking the Mark Areas to Keep. And Mark Areas to Remove buttons to manually choose which portions of the image to keep and which not. When you are satisfied with the result, press the button (✓) Keep changes located at the top, and you’re done.
Of course, changes made to the photo background will only apply to the copy of the image displayed on the slide and will not affect the original file. However, if you wish, you can save an edited copy of the picture by right-clicking on it and selecting the Save as Image… item from the context menu. Easy, right?
How to remove the background from an image with Paint
Suppose you have to remove the background from an image. That is not incredibly complex. You can also resort to much less “powerful” solutions than those I have told you so far. One of these is Paint. The graphics program that is installed. On virtually all versions of Windows and that allows you to make small changes to images.
To remove the background from a Paint photo, right-click on it and select the items Open with> Paint from the menu that opens to import the file into the application. Then press the Select button, which is located at the top of the Paint window. Choose the tool. Select a freehand figure and draw—the contour line of the area you want to remove. I recommend trying to be as precise as possible because. The quality of the final work will depend on this.
Once this first phase of the work finish, press the Select button again. Click on the Invert selection item and drag the background out of the drawing area. Without even realizing it, you were able to remove the background. You are using the straightforward tools made available by Paint. Suppose you are satisfied with the work done. Save the modified image by pressing. The blue File button is located at the top left and then clicking on the Save item.
Ah… I almost forgot! On Windows 10, it is possible to use Paint 3D. The updated version of the “classic” Paint I told you about earlier. This application integrates a smart selection tool. In addition to being easy to use. Is also much more accurate than the manual selection of Paint. As I have already shown you in this other in-depth study dedicated to the topic.
How to remove the background from an image with Preview
Also, on Mac, an application allows you to remove the background from images quickly and easily, without resorting to “external” solutions. Of course, I’m talking about Preview – macOS’s default image and PDF reader, which packs some useful features for the purpose.
To remove the background from an image with Preview, all you have to do is open it with the program by double-clicking on it or, if you have “played” with the macOS settings by removing Preview as default player, by clicking right on the file to open and then clicking on the items Open with> Preview from the context menu.
After importing the image, you want to retouch it in Preview. Press the pencil icon located at the top, press the dotted square situated on the left. And then, select the Smart Lasso tool from the menu that opens. Now draw a red line with the cursor on the perimeter. Of the subject, you want to separate it from the background. Press the Crop button located at the top right. Click the Convert button (if the image is not in PNG format ) and. Suppose you satisfy with the obtained result. Select the Save item from the File menu. Et-voila! The background was successfully removed!
How to remove the background from an online image
Did you know that it is possible to remove the background from an online image? No? Well, now you know! Using some web applications. In fact. It is possible to cut out the photos. It is making the background transparent in a few clicks. Of course. How to remove pdf passwords The final result will not be as accurate. As what can be obtained using Photoshop. GIMP and the like (especially if it is rather complex images), but I guarantee you it’s worth giving them a chance.
One of these services is Edit Photos for Free which. As you can guess from its name, it is entirely free. Easy to use. Does not require registration and. Above all works without having to resort to additional plugins. What more could you ask for. To use it connected to this page. Press the Close button to close the initial tutorial that appears on the screen. And drag the image you want to retouch in the drop image box.
When the upload is complete, use the yellow brush to trace the edges of the subject you want to keep. Then select the green bush to highlight. The area you don’t want to remove and finally use the red brush. To color the size of the image you want to remove. I.e., the background.
Then press the Play button located in the center to preview the photo you have retouched. Make any changes to refine the selection and. Best investment apps As soon as you satisfy with the work done. Press the yellow download button located at the top right to download the output file.
Other online services to remove the background from an image.
Many other online services remove the background from an image that deserves to mention and tried. Take a look at the ones listed below. And try the ones that seem best suited to your needs.
- Photopea – it is a web application based on HTML5 (and which therefore works without resorting to any plugin), characterized by an interface very similar to that of the “classic” photo editing programs, such as GIMP and Photoshop (both mentioned in this guide). It includes tons of tools that allow you to remove. The background from your photos. Which are easy to use and, most importantly, free.
- Remove. Bg is a very famous Web portal that uses a robust Artificial Intelligence algorithm to recognize human faces and cut them out almost entirely. Although it is free. I point out that it can only be used for personal purposes. And processing low-resolution images: to break down these limits, you need. To subscribe to the Premium version. Which starts from 9 euros/month.
- Clipping Magic – is another online service that allows you to crop photos quite easily. Unlike the solutions I have proposed so far, however, it is a semi-free solution: although you can remove the background from the free photos, to download the output files, you have to buy credits by subscribing to a monthly subscription, which starts at 3.99 dollars and that allows you to download 15 files.
How to remove the background from an image on smartphones and tablets
Would you like to know if it is possible to remove it? The background from an image by acting directly from. The smartphone or tablet. Of course, you can. To do this, all you have to do is download the right apps and use them correctly. Here are some of the best solutions suitable for this purpose: make fair use of them!
- Adobe Photoshop Mix ( Android / iOS ) – it is a free app developed by Adobe that allows you to work on multiple layers, retouch your shots’ main parameters, apply filters, and, what interests you closely, remove the background. Suppose you are interested in learning more about how it works. Take a look at the guides dedicated to apps. For changing the set of photos. And Photoshop apps that I published on my blog.
- PhotoLayers ( Android ) – This app also allows you to work on multiple layers, 11 to be exact, and remove the background from images in a few taps. Thanks to its user-friendly interface, it is straightforward to use, as I have already shown you in this guide.
- Superimpose Studio ( iOS ) – This app, somewhat similar to PhotoLayers, allows you to quickly and easily remove the background from your photos. It’s free. But to eliminate advertising and access all its functions, you need to make in-app purchases. You are starting at € 1.09 per item. Suppose you want to learn more about it. Take a look at the second part of this guide.